TROPICAL GARDENING
Plants need to be treated differently in warm climates. The affect of temperature creates different growth responses to those seen in cooler areas.
These responses are generally seen as:
- Faster growth
- An extended growing season;
- More tender and sappy growth.
The warm climate also tends to encourage a greater amount of pests and disease problems. This is the result of extended breeding periods available to the pests. The higher humidity that occurs in many warm climates also promotes fungal diseases. It is important to note that this should not be seen as a disadvantage; warm climate plants have adapted to the climate and to the increased incidence of such pests and diseases. Damage is either resisted or overcome by abundant growth, or tolerated by most plants. In affect, it is the plants not suited to the climate or the site - that become most affected by the pests and diseases.
Warm climates may promote such excessive growth that plants may become weed-like and invasive. Lantanas for example; when grown in cooler areas are very ornamental and controllable, however when grown in warm climates they tend to become environmental weeds.
 SPACING PLANTS
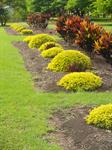
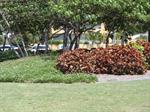
In humid warm climates, spacing can be critical for many plants. Tropical plants like humidity therefore appreciate close spacing so that nearby plants help to maintain a humid microclimate. However, if temperate plants are grown in warmer climates this close spacing may lead to plant death due to increased humidity. By spacing these plants further apart, the ventilation will remove excess humidity and the plants should have a better chance of survival.
Spacing can also be used to reduce the incidence of diseases. If plants are crowded too closely competition for sunlight, water and nutrients may lead to slowing down of plant growth. This in turn may lead to poor plant health and pest attack. When spacing plants out in the garden, consider the natural spread of the plant and the overall appearance desired in the garden.
MULCHES
 Mulch is great for a garden. Mulch keeps plant roots cool in the heat and warm in the cold. It also slows weed growth, holds moisture in the soil, stops the ground getting muddy, helps minimise soil compaction and usually just makes things look neater. Organic mulches will also provide nutrients to the soil as they decompose, and help improve soil structure.
Different mulches have different characteristics, so think about which mulches are best for you, and choose the right one for the job at hand. The price of different mulch materials will vary considerably and is often connected with whether the mulch is a 'waste' product in your area, or is being transported from another area.
Mulches can be divided into two broad groups - organic and inorganic:
Organic
These mulches were at some point of time a living plant. Plant material is beneficial as it returns nutrients back to the soil, and often provides a natural look to the garden.
The main organic mulches used are:
• Wood (chips, shavings and sawdust);
• Sugar cane waste/by-products, Lucerne hay and pea straw;
• Peat moss (note this is not considered environmentally sound as peat moss is fast becoming a scarce resource);
• Other plant matter - compost, leaf litter, coconut fibre, rice hulls, straw, hay and paper;
• Mulches derived from the timber and forest industry, such as wood chips, pine bark or wood shavings used to be considered as waste products and were often burnt to get rid of them. They may contain toxins which may inhibit plant growth therefore weathering for 2-4 months is recommended first to allow leaching of the toxins. Most timber/wood products will rob the soil of nitrogen (this is called nitrogen draw down) in the first few months so it is recommended that an application of a nitrogenous fertilizer be applied just to the mulch.
Inorganic
These mulches are not organic by source. The do not provide nutrients to the soil but still provide water conserving attributes, and include:
- Rocks, stones, gravel, etc.;
- Sand.
What about a combination of mulches?
Various mulches can be combined in a garden bed. If there is a section, which in wet weather has a lot of water running through it, then a heavy mulch can be used that will not be washed away, e.g. river pebbles. If the water flow is very heavy it may be worthwhile creating an artificial dry creek bed using river stone concreted in place combined with loose river stones. Adjoining this area leaf litter can be used. This is ideal for native plant landscape gardens, or rainforest gardens.
In selecting which mulch to use consider the following:
- The weight of the mulch - will it blow away in the wind, be washed away in light rain or be dislodged easily by watering; will it slip if the garden bank or bed has a steep slope, is it easy to spread?
- How long before it has to be replaced or topped up?
- Is the mulch readily available?
- How much does it cost?
- Does it require some sort of edging to prevent it being dislodged?
- Does it encourage the presence of any vermin or pests into the garden?
Mulching Depth
These days the recommended mulching depth, depending on the material selected, is between 5cm – 7cm. At this depth most mulch will suppress weeds but still allow water penetration and keep the soil cool in summer and warmer in winter. Mulching with less than this will be unsatisfactory but deeper mulch (although still often recommended) has through research in recent years been found to cause damage to plants and the soil. Thick layers of mulch (over 7.5cms) can contribute to water logged conditions - especially in clay soils; many plants resent wet feet! When excess mulch is applied right up to the trunks of trees it can lead to rot if the bark is continually wet – these conditions also favour disease. Thick, fine mulch can also prevent water penetration through to the soil – fine mulch often creates a hard mat on its surface and water just runs off the top rather than through; coarse mulch is always preferable. Thick mulch can also create a nesting home for rats and mice!
It is not recommended that you lay impermeable plastic sheeting under mulch as it prevents water penetrating, and the reduced flow of air into the soil may cause problems for your plants. It has also been reported as encouraging cockroaches and nutgrass.
Weed mat appears similar to black plastic, but is permeable allowing water penetration and the flow of air around the plant roots, while greatly reducing the amount of weed growth.
IMPROVING DRAINAGE IN SOILS
Many warm areas have very high rainfall. Depending on which plants you wish to grow poor drainage may sometimes be a problem.
Overly wet ground is undesirable in most landscapes because it is unhealthy for plant life. It reduces the oxygen available to plant roots and beneficial soil organisms. It decreases soil temperatures, slowing root respiration. It increases humidity levels, which may lead to an increase in plant diseases. Wet soils may encourage the spread of root-rotting organisms such as Phytophthora and Pythium.
The availability of nutrients may be impaired or changed, for example, phosphorus may become less available in wet soil while manganese becomes more available. Surface water can become stagnant, unhealthy and unpleasant for people and animals. The ground can become inaccessible, slippery or soggy - therefore not useful for recreation and other purposes.
There are a number of ways to readily improve drainage, including:
- Growing your plants in raised beds. Soil can be retained using materials such as timber, rocks and concrete. Growing your plants on mounds. Drainage can be further improved by using builders’ rubble, old brick pieces, rocks, etc. to form the base of the mound, with sufficient soil placed on top to support plant growth.
- Installing sub-surface drainage (e.g. slotted plastic agricultural drainage pipe).
- Diverting surface runoff away from your garden by installing surface drains or diversion channels, or by creating a sloping ground surface.
- Growing those plants that require good drainage in containers.
PLANTING
The best way to approach planting is usually the simplest way.
- Keep plants together in compatible groups. Keep natives together, herbs together, roses together, or alternatively plants that require similar amounts of watering, or similar amounts of shade.
- Let the fittest survive.
- Mass plant areas (i.e. several of the one variety together).
- Be prepared to get rid of plants which don't work (either don't look good or don't grow well). There's no harm in being ruthless.
Preparation
Decline in many plants over years can sometimes be latent responses to poor soil preparation. If the soil and site are prepared for the plant, it should grow well and thrive as expected for many years. If it is not, then the plant may exhibit unthrifty growth, may be prone to more pests and diseases, may not flower well and may not reach its full potential.
Soil preparation usually involves adding organic matter, making a raised garden for the roots and ensuring is it well mulched and watered as required.
There are exceptions, of course. Some plants native to bogs will require a far wetter soil. Some plants from inland desert zones will require excellent freely drained soil the list of variations goes on.
The key here is to prepare the soil as needed by the plant. By doing this you save yourself a lot of heartache in the future.
Time of Planting
Avoid planting on hot or windy days. Plants are more likely to dry out in these conditions.
If trees and shrubs are likely to get a lot of attention, they can be planted successfully at almost any time of year however if they are going to be neglected they are best planted prior to the cooler months; or wetter time of the year.
When planting in warm areas where the wetter months are over summer, such as the northern parts of Australia, you can plant almost any time of the year as long as you provide sufficient moisture during dry periods, and good drainage during wet periods.
Availability of plants may influence planting time. If the plants are only available at one time of the year then the options are to plant immediately and take certain precautions to ensure their success; or look after the plant until the right planting time arrives. If planting immediately, take extra care when teasing out the roots before planting and shade the plant from excessive sun. Prune the plant lightly and keep it well watered.
Plant most container plants as follows:
a) Thoroughly soak the plant in the pot to help the plant come out of the pot easier, and allow it to drain.
b) Dig an irregular shaped hole - 1½ times the depth of the pot.
c) Add some compost to the soil you removed from the hole.
d) Fill the hole with water and check for drainage (this also wets the sub-soil).
e) Carefully take the plant out of the pot.
f) Loosen any exposed roots (i.e. if most of the roots are inside the soil ball, you might not need to do much. If there is a tight mass of roots on the outside of the soil ball you may need to break a centimetre or so into the ball all over). Free any roots circling the bottom.
g) Place the plant in the hole and cover with soil. Firm down gently but firmly (don’t dig your heels into the soil as this compacts it.
h) Make a lip of soil around the base of the plant to hold water.
i) Soak thoroughly with water.
j) Top dress with fertiliser, water again and mulch.
Adding Fertiliser
You can get concentrated, fast acting fertilisers (which will feed more nutrients to the plant, very quickly) or slower acting, long term fertilizers. There are many possibilities in between these two extremes. Avoid direct contact between the roots of a young plant and the stronger fertilisers. Usually a slower acting fertiliser is more appropriate for use at planting, particularly in sandy soils. Blood and bone, Osmocote (3 month formulation), or something similar is ideal for planting most plants.
More from ACS
Course - Learn where and how to grow tropical plants
Create a Tropical Garden; as indoor plants;
Propagate or breed.
View Course
Course - learn how to include range of lovely scented plants in gardens. Create a scented garden.
View Course
Design gardens in a tropical style; for both tropical and temperate climates.
View eBook
Ebook - A must have text for warm climate gardeners. Directory, care etc.
View eBook
Ebook - Expand your knowledge of tropical plants: how to use and care for them with this great text.
View eBook
Ebook - 108 stunning pages and photos: ideal for landscapers, gardeners and home gardeners interested in creating beautiful water features.
View eBook
Ebook - Learn about these amazing plants, their identification and care with this informative text.
View eBook
Course - for landscape consultants, garden designers, horticultural advisors, project managers, or anyone else who works with landscapes and needs to improve their landscaping ability.
View Course